Posted
Create Custom Attribute Types and Validation Rules, then use Playbooks to populate them automatically
I was working with a customer who wanted to use ThreatConnect’s Task and workflow features like a traditional ticketing system, with a unique identifier for data objects that they could key off of and pass to other teams as needed. This is usually a value, like an “Incident Number” or “Task ID”. ThreatConnect has these values and you can see them in the weblink URL for any data object within the Platform. The customer wanted to pass these identifiers to other users/teams/applications, so we decided to use a combination of custom attributes, custom attribute validation rules, and Playbooks to make the data easier to work with, and meet their goals. Along the way we also found that once created and populated, our new attributes were searchable within ThreatConnect.
In this post, you’ll learn how to use the following ThreatConnect features:
- Create a custom attribute type
- Create a custom attribute validation rule
- Use Playbooks to automatically populate the new custom attribute
- Use the Basic filters on the Browse page to find a record with a specific value in the attribute
- Use the ThreatConnect Query Language (TQL) and Advanced filters to find records matching a pattern in the attribute
Note: This example could easily be reused for other purposes.
Maybe you want to poll some external data source such as DomainTools and fill an attribute with a retrieved value each time you create a new incident record? This process will show you how. And, if you have a need for some other custom attribute, the steps taken here will guide you in creating the necessary configuration.
First: for any of the Group data types, ThreatConnect already creates a unique identifier which is visible in the weblink URL:
![]()
In this example, we can see an incident with the identifier “672522”. This is the single value which identifies this incident within the organization. With this piece of information, we can always track to exactly this single incident. This URL is where we will harvest the identifier, and place it into a new attribute, which we will create.
We’ll create the Attribute called a “TC ID Number”, and make it available to Group data types such as Adversaries, Incidents, Tasks, and Threats. Rather than call this attribute something like “Incident Number” we’ll deliberately keep the name generic so that it is useful across multiple data types. You’ll see the value in this decision later in the article.
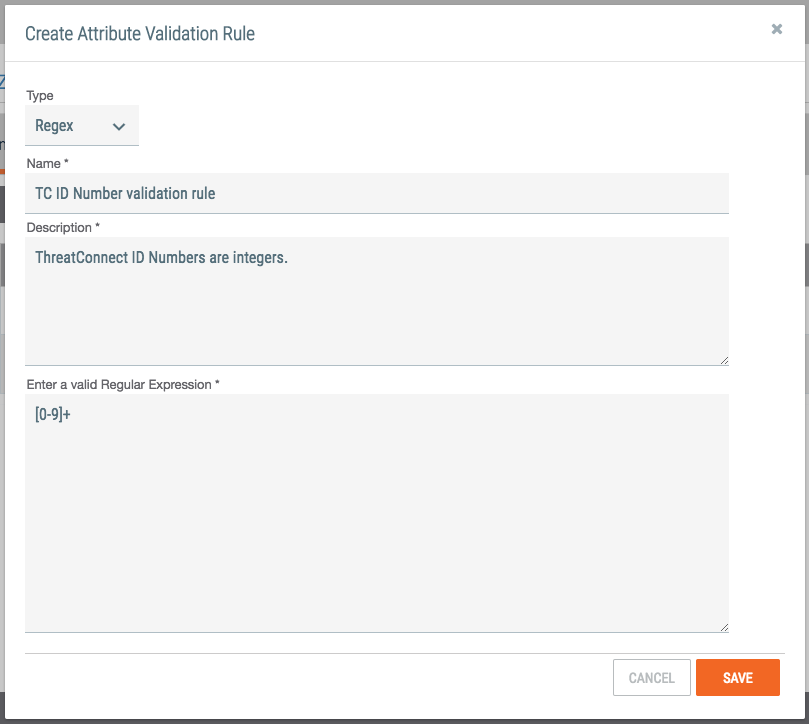
Before we create the attribute, we will create an Attribute Validation Rule. This will simply validate the data that anyone places into this attribute. In this case, we’ll use a simple rule to validate that only digits are entered. We’ll call this rule the “TC ID Number validation rule”. To create a rule, select “Org Config” in the drop-down menu, and then select “Attribute Validation Rules”. Create a “New” rule, and complete the form as follows:
Save this rule. Now you are ready to create the new attribute. From the same Org Config page, choose the link for “Attribute Types”, and then create a “New” attribute. Complete the form as follows:
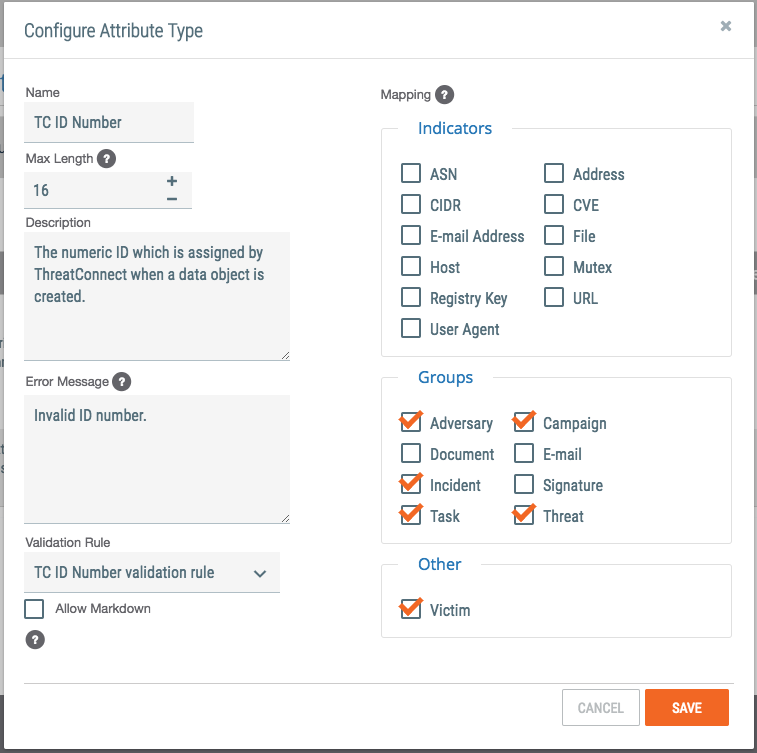
Notice we are creating an attribute called “TC ID Number”. We set a maximum length of 16 characters, and selected several Groups where this attribute may be used. We have also selected our validation rule from the previous step.
This instance of ThreatConnect now has a new attribute available. The obvious question is, how do you put it into action? You can, of course, add this attribute to your Groups manually, one at a time, but what if we applied it automatically whenever the group object is created?
That’s where Playbooks comes in!
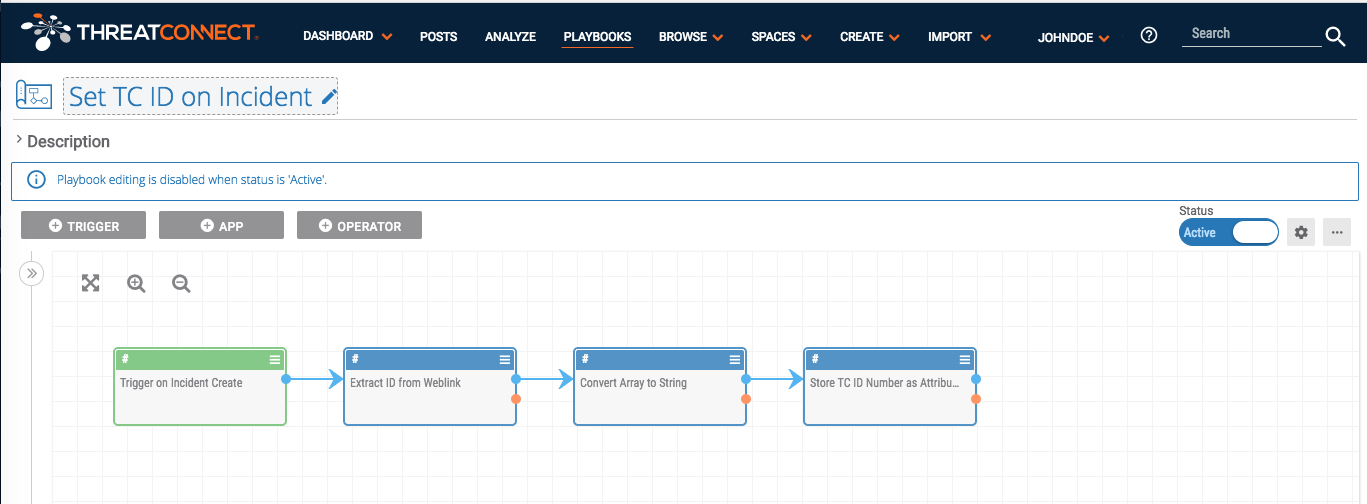
Following is one of four Playbooks I created to utilize this new attribute. The Playbooks are triggered when a new Group object is created in My Org. The Playbook extracts the identifier from the URL, and stores it in the new attribute. The Playbook looks like this:
It does not matter how the new group object (incident, in this example) is created. It could have been created manually through the Create Group wizard, or it could have been copied into my org from another source, such as the ThreatConnect Intelligence source. The Playbook will trigger on the new object and fill in the attribute automatically. Below we have multiple Playbooks to make this possible:

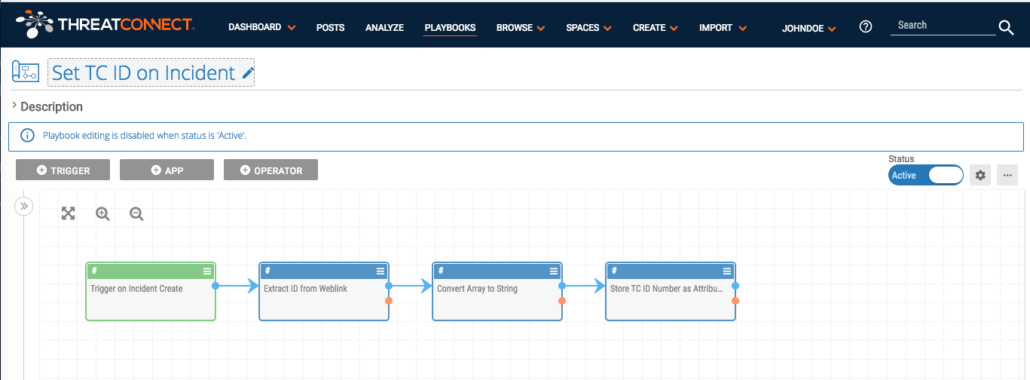
After the Playbooks are installed, configured, and set to Active status, any of the defined groups that are created will have the “TC ID Number” attribute populated.
Moving forward, you now have a state where the TC ID Numbers are populated. You can pass these values to other users or even other systems for tracking purposes. For instance, your IR team might use an external ticketing system like ServiceNow to receive data about new investigations to begin. You could pass the weblink URL of our incidents in ThreatConnect to ServiceNow and perhaps use the TC ID Number as the display value for the link. Passing these values to ServiceNow is very straightforward with Playbooks, but beyond the scope of this blog.
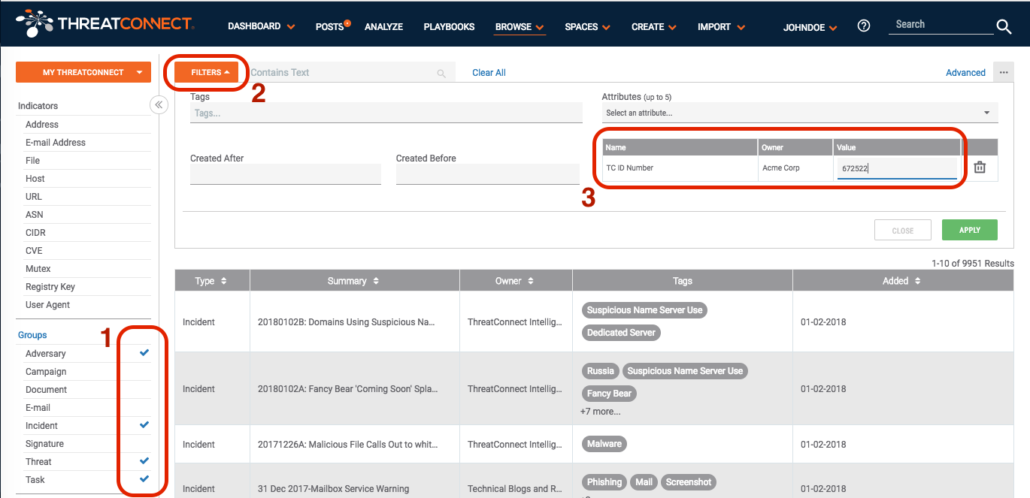
Recall that I mentioned that our new attribute would be searchable. That’s available to us now without any additional configuration. On the Browse page, we can select the Group types we want to browse, then in the Filters, we can select the attribute by name. Here are those three steps:
In this example, the Playbook is looking for a group with the identifier shown earlier (672522). The result is:
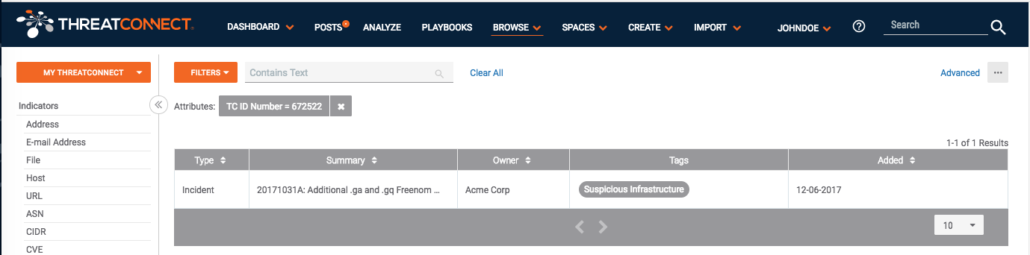
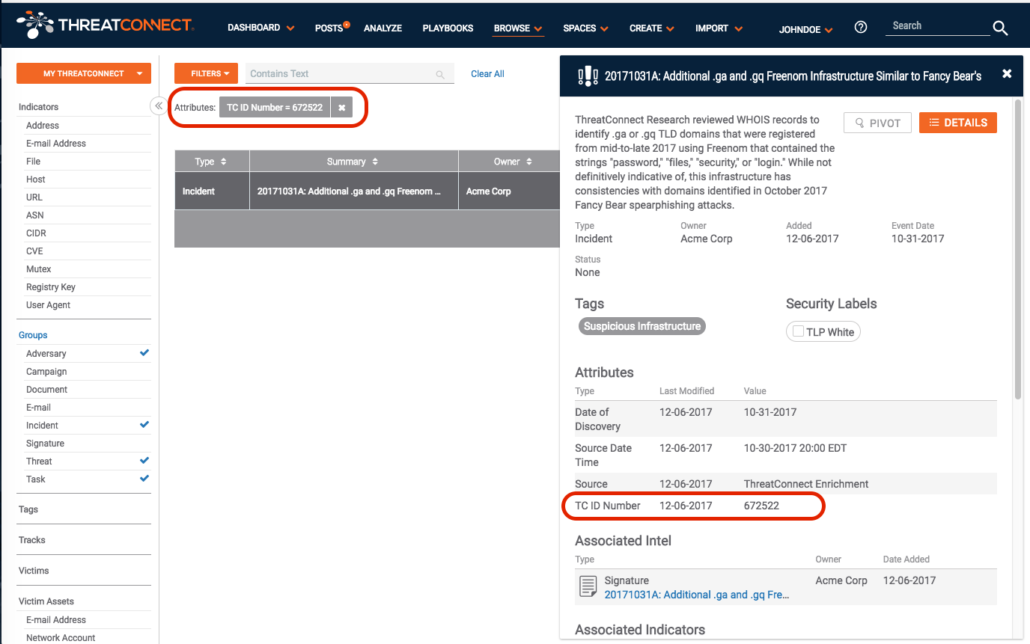
Notice we have filtered on our specific attribute and value. We found the exact entry we were searching for, and as a final confirmation we can see the “TC ID Number” for the incident in question:
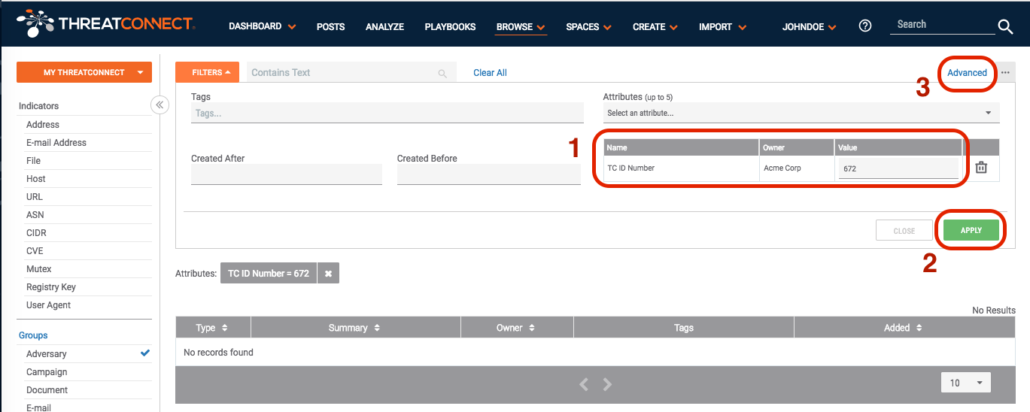
You can find an exact value. But you might want to view a range of values with your new attribute. This is possible, but you have to move from the Basic filters on the Browse page to the Advanced filters. But first, you need to configure the search as we did above, looking for our new attribute. This is essential because it will be carried over to the Advanced search and will show the database name of the new custom attribute. So to complete this step, configure the filters as before, and select the “Apply” button. It doesn’t matter at this point whether you have results or not, we simply want to compose the search. Next, select the “Advanced” link at the top right of the page:
When we jump over to the Advanced search page, we see our search filters converted to the ThreatConnect Query Language (TQL)!

And in this example you see that the custom attribute which we called “TC ID Number” has the internal name of “attribute661”. We can now take advantage of the features in TQL to add wildcards to our search. For example, I could ask it to show all group objects with a TC ID Number that starts with “672”. I do this by using two features of TQL: the “like” operator, and the “%” wildcard character. By looking for ” attribute661 like “672%” ” , it will show any records where the attribute starts with “672”: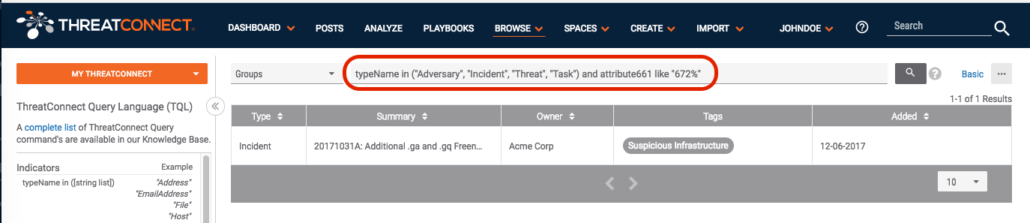
Hmm. Only one hit. Let’s open it up and look at any groups starting with a “6”:
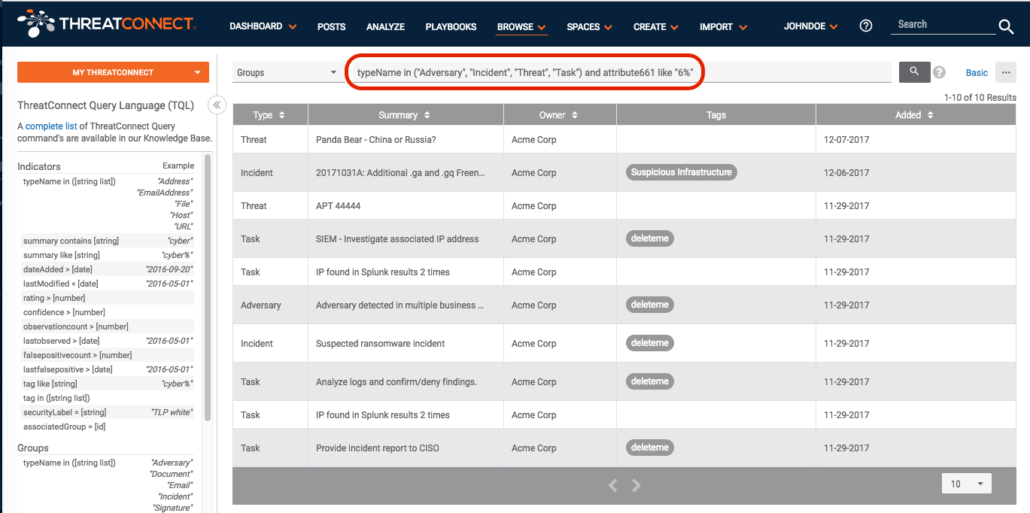
As you can see there are Threats, Incidents, Tasks, and Adversaries which all contain a value in the “TC ID Number” field starting with a “6”.
In summary, we started with a desire to show the assigned unique identifier for incidents, and ended up with a validated custom attribute which can be used across multiple group types, and is searchable with both the Basic and Advanced filters on the Browse page. And, you can pass the TC ID Number to other integrations through Playbooks if you choose to.